Quick Start Guide
Camera Connection
To power up the camera - connect it to Ethernet switch with PoE.
IP address of the Camera
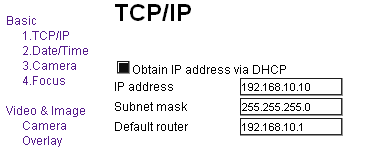
Default IP address of camera is 192.168.10.10/255.255.255.0.
It is possible to change it (or set DHCP) using Browser.
You can list all current active cameras by Network Scanner Tool.
Note: After address is changed - system is automatically restarted. After camera gets Active mode - it will be available on changed address or on address assigned by DHCP server on your network.

Working with the Web Browser
System supports all popular browsers: Microsoft Internet Explorer, Mozilla Firefox, Google Chrome.
To open camera configuration - enter IP address of camera to browser's address bar and press Enter.

Configuration
- Camera
Menu Camera allows to set:
- Zoom
Can be set between 1-9999. 1 is wide, 9999 is tele.
- Exposure mode and parameters
In each mode only some parameters are valid. Others are ignored.
- Infra red filter.
It can be set to one of modes:
- Off - camara picture is color, but in lower light the picture has more noise.
- On - camera picture is black/white and picture in lower light has less noise.
- Auto - filter is switching to On and Off state depending the light. Level of switch can be set by Auto IR Threshold
- Overlay
Allows to add user text, date and time to each image.
- Focus
Allows to set optical focusing mode and its parameters.
- White Balance
Allows to set White Balance mode. If mode Manual is used, parameters White Balance Red/Blue Gain can change color tone of image.
- Video Streams
Camera allows to use two independent video streams in one time.
Configuration of these streams can be accessed using menu Video Streams
There are limits of the dual streaming:
- Maximum FPS on Large stream at maximum resolution is 10 FPS.
- Maximum FPS of Small stream is limited by FPS of Large stream. E.g. when FPS of Large stream is 15 FPS, then maximum FPS of Small stream is 15FPS. Limits are applied automatically on background to keep system stability.
See camera picture in the browser
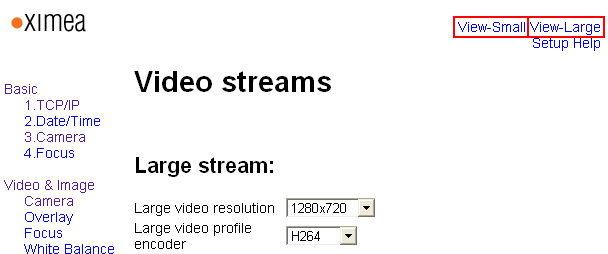
To open camera picture - Click View Small or View Large in the upper right corner of configuration window.

- Note: To display video stream in browser, the Apple Quicktime should be installed. To install Quicktime:
Download QuickTimeInstaller.exe using: http://www.apple.com/quicktime/download/
Run downloaded file and follow installation instructions in window.
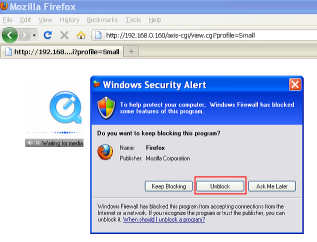
If Windows Firewall is enabled - then after first attempt the warning can show. Plese click Unblock to allow Quicktime plugin to receive data.

Displaying the video in RTP clients (e.g. VLC)
To open video stream in the RTP client - enter address of stream to client.
E.g. if address of camera is 192.168.10.10 - address of the Small stream is rtsp://192.168.10.10:8554/media
Address can be read in menu: Video Streams.
Recording software
See Recorders section.
Parameters setting
- Parameters changed with Browser:
Upon each change of parameter the button Set or Set & Save to EEPROM should be set.
Button Set just set current change. After camera loss the power the parameters changes losts also.
To store parameters to be non volatile - use Set & Save to EEPROM.

- Parameters changed over URL request
It is possible to set many parameters automatically by URL.
See CPARAPI for details.
- Parameters changed through Onvif interface
It is possible to set current large encoder type from Onvif interface.
These changes are non volatile.
Reset all camera parameters to default
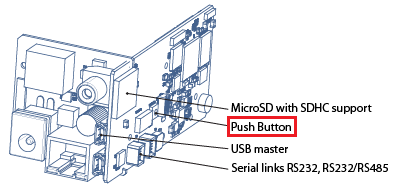
Camera contains one button (near SD card holder). When it is depressed while camera is in Active mode - all parameters are set to defaults (e.g. IP address, resolution, ...) and firmware will restart.

Picture of button location.
Check the current build of firmware
Open browser and click menu System. Current firmware Build will show with possibility to Upgrade it.
Please read the Firmware Limitations before reporting problems.


